 For our March Engineering Challenge we built devices that would carry a ping pong ball down a piece of fishing line. I got the original idea from a PBS Kids Design Squad activity, which I then adapted a bit for a wider age range. The original challenge suggested using 4-5 feet of fishing line, as less was too short and more was likely to sag. I didn’t measure exactly, but I know the width of the stage area in our meeting room is about as wide as I am tall, which makes it roughly 5 feet.
The children were given straws, pipe cleaners, paper clips, egg cartons, spoons, washers, paper, and tape. The initial challenge was simply to build something that would carry the ping pong ball down to the bottom of the line. I had a whole “and the stage is made of pingpong lava, that doesn’t hurt you, but will burn up your pingpong ball!” story to help forestall the inevitable wise-guy just letting the ball fall and bounce to the end of the stage. My audience skewed younger – of the 30+ kids, I’d say at least 20 appeared to be 8 or younger – and they really bought into the lava story with enthusiasm.
With my engineering challenges I like to have multiple levels of challenge. Once a child has completed the first level, I give 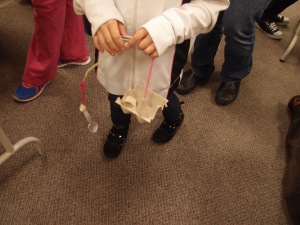 him or her the second challenge. This way I can differentiate everyone’s experience, allowing everyone to walk away feeling successful. Some kids will only complete the first level, other kids will complete several. For this challenge, the second level was supposed to be similar to the PBS Design Squad rules, which was to make the ping pong ball travel to the bottom in less than 4 seconds. However, I ran into a problem, in that all of the vehicles managed to do this on the first build, essentially erasing it as a challenge.
At first, I thought perhaps the lines were not at the right angle. The original challenge also suggested an angle of about 30 degrees. Re-evaluating the lines, I decided they were probably more like 45 degrees. I lowered two of the four lines to be closer to 30 degrees, but that didn’t seem to make much of a difference. I decided to change the second challenge to be to see how slowly you could make the ping pong ball go down the line.
The older kids seemed to really get into the challenge of making it go slowly, and were pleased with their results. At the beginning of the event, I had emphasized that the Engineering Process involves constantly testing your design and then going back to improve it. I was trying to forestall frustration in what I had initially deemed to be a true challenge for the younger-than-average audience, but apparently the kids took the message to heart. Despite the fact that it actually ended up being a fairly straight-forward challenge, many of the children went back and redesigned their vehicles, even after meeting with success, so that they could “be the best possible.” Some of the children spent a lot of time each designing several separate vehicles using different materials so that they could determine which one worked the best. Most of the children were so caught up on redesigning and recreating that they never came to me for a second level of challenge, but that was more than okay, as the point of the exercise was to have fun, feel confident about building things, and walk away thinking like an engineer, all of which were clearly accomplished.

 emphasized needed to be used if the children were going to use the wall as part of their building process. (And here I’d like to put in a plug for painter’s tape. It’s more expensive than regular masking tape, but otherwise so much better! Unlike masking tape it never takes the paint off the walls. It’s also much easier to peel off the roll, a problem we’ve had with several different brands of masking tape. It’s almost as sticky as masking tape, and I’ve successfully used it to hold posters up on the wall for as long as I wanted the poster to stay up.)


 Some of the children added the toys that were already in our playroom to their marble runs. Of particular interest were the buckets we keep smaller toys in. Several children wanted to set their marble runs up so that the marbles would land in the bucket. (I wish I’d thought of that ahead of time, because once this idea caught on it definitely made containing the marbles rolling all over the floor much easier.) Other children used the buckets as ramps in their building process. Another child spent a lot of time with a school bus, first figuring out how to get the marble to roll through the bus (harder than it sounds when you’re quite small and the materials barely fit) and then using it as a base for a loop-the-loop that was her own self-initiated challenge.


 The effects of static electricity are visually stunning and a very common life experience so I knew that I wanted to use it as a theme for Science Storytime. I wasn’t able to find a book for preschoolers that went along with the theme, so we started with a simple discussion of static electricity. Many children identified with getting shocked after sliding at the playground, or having their hair stick up when taking off a hat. I talked a little about how things can get charged in a very simple way, using my hands to represent a charge (closed fist) and a noncharge (open palm) and how they fit together. Then I demonstrated with a balloon and some tissue paper. In addition to watching the tissue paper stick to the upside down balloon, I had also made a ghost out of tissue paper, and used the static charge to make the ghost dance around and haunt the room without even touching the balloon.


 defined as my being able to see air between the tennis ball and the ground. The students were given tape, pipe cleaners, paper plates, straws, popsicle sticks, yarn, and paper clips to work with. Some students made actual towers, others had barely the width of a straw between the ball and the table. One team of siblings decided to use the edge of the stage, and since I like to encourage creative thinking, I declared that since the only rule was that it had to have air space, I didn’t mind. All were deemed successful.
 on. Since I like to encourage the children to frequently test their projects to see if they need any design changes, that quickly became a problem. To try to overcome this, I had the students build their towers on top of paper plates that could then be moved to a separate testing space. However, I should have specified they use upside down paper plates, because the raised edge of the plates caught the wind from the fan and sent the projects flying. This was easily fixed by taping the edge of the paper plate to the table, but was an extra added step.

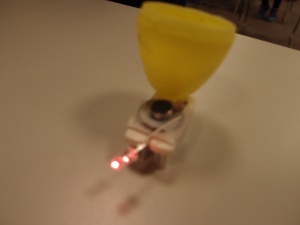 Our September Engineering Challenge was a bit of a departure from our previous challenges. Usually I try to keep the Engineering Challenge programs very open ended. I declare a goal, and then give the children supplies to achieve that goal in whatever manner they can think of. The Brushbots were much more “follow the directions” for the first half of the program, with creativity coming once the brushbot had been assembled and we were ready to decorate our creations. However, I thought that making little vibrating creatures was too appealing to pass up.

 For our Science Storytime about surface tension I couldn’t figure out a good book to use for the subject, so we just skipped the reading section. We talked a little bit about surface tension, trying to tie it back to what we’d talked about
 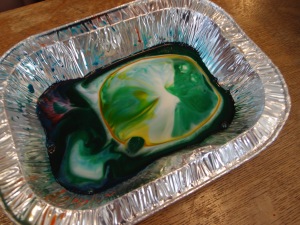 individual tins for each child. We put drops of food coloring into the milk, then cotton swabs to dab soap onto food coloring. This caused the surface tension to break and the colors to swirl dramatically. The children were particularly taken with this activity and repeated it over and over, in some cases often enough that we needed to replace their milk so they could start over. Because the colors mix together, it also became a bonus lesson on color mixing. I have not tried doing this with liquid watercolors yet, but I need to attempt that, as I find liquid watercolors are so much easier to clean up and don’t stain your fingers.